Pacey Announcement Feature
To ensure that businesses do not use WhatsApp for randomly spamming its users, WhatsApp does not allow businesses to send out just any arbitrary message to its users. They only allow a “Business Template Message” that they have approved, to be sent. This is why PaySpace only offers a few select template options for sending out structured messages to employees, namely, that the employee’s payslip for a period is ready and that Pacey is available as an ESS channel for new customers.
We have now included the ability to communicate a custom message to employees. The employee will be sent the following structured message to invite them to read the actual announcement, if they choose, by tapping on a “Read Announcement” button within WhatsApp, as per the following screenshot.
Custom Form
To utilise this feature, customers need to create a custom form within PaySpace where they can capture the message that they wish employees to receive.
The custom form feature is only available to customers on the Master edition and therefore this specific Pacey announcement feature is only available on Master edition, whereas the other message templates are available for customers that have licensed Pacey.
The following instructions describe how a user can configure a specific custom form to capture custom messages. Ensure that the exact field values are entered and options are selected in the below screenshot. Click Save.
Navigate > Configuration > Basic Settings > Custom Form Configuration
Click on the “Fields” tab and select the “Pacey Announcement” option in the Form Category drop down list. The following 3 fields need to be added:
- Subject
- Message
- Expiry Date
Start by dragging the “Text” type field option from the field types on the right of the screen and drop it in the dotted line frame on the left. Ensure that the following exact values are entered and options are selected for the “Subject” field.
Lastly, drag the “Date” type field option from the field types on the right of the screen and drop it in the dotted line frame on the left below the Message field. Ensure that the following exact values are entered and options are selected for the “Expiry Date” field.
This optional field allows a user to indicate when a message should expire if the employee does not read it timeously. For example, a message announcing a particular company event that takes place on a date, may not be relevant if an employee only accesses the message after the event date. In this case, Pacey will let the employee know that the announcement has expired.
Ensure you click on the "Update" button at the bottom of the screen to save everything.
Capture Announcement
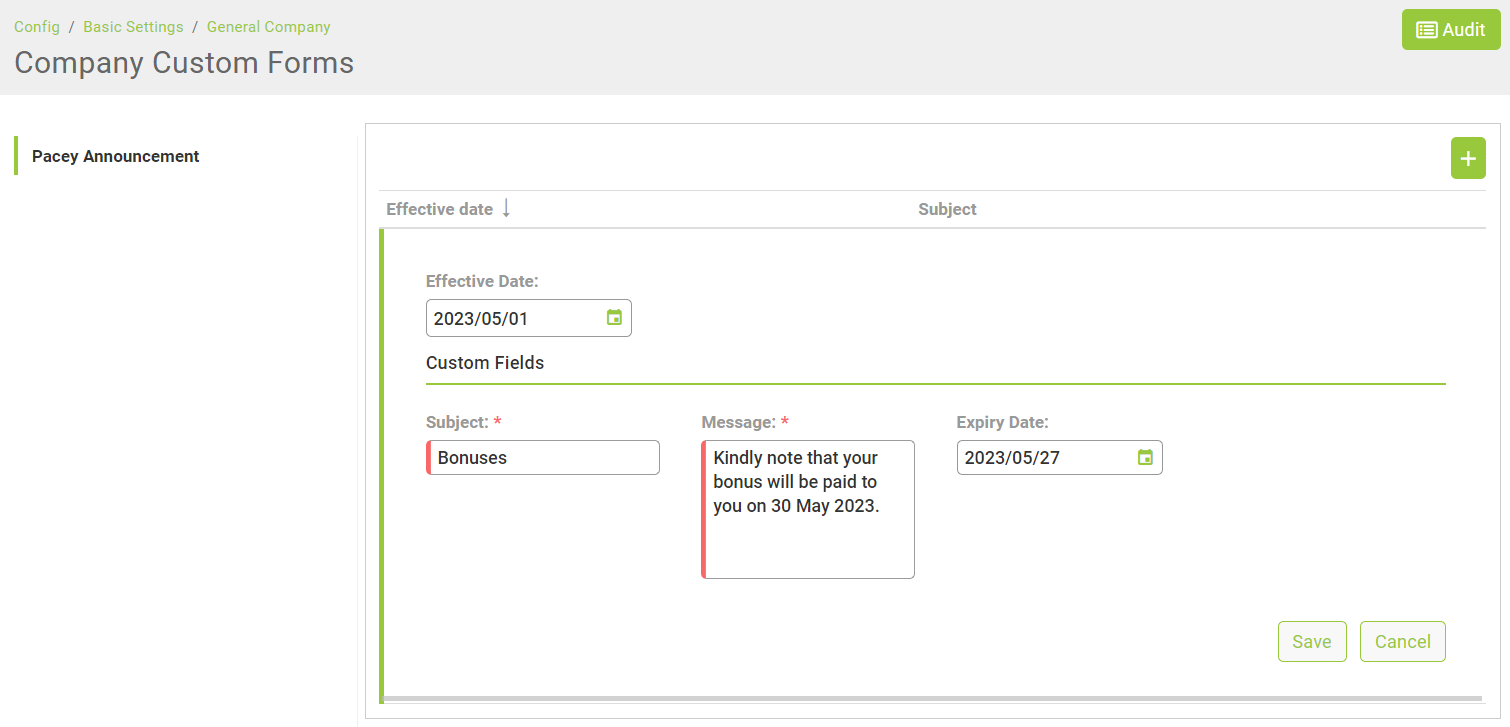
Navigate > Configuration > General Company > Custom Forms
Select the “Pacey Announcement” form from the left menu that you have just created. Complete the relevant fields as per the below example screenshot. The Effective Date indicates which message to send to the employees based on the current date that the Excel sheet is uploaded on the Bulk Actions screen below. The message with an effective date closest to the current date will be sent. You can build up a history of messages that have been sent for record purposes.
You are now ready to upload an Excel sheet of all the employees that you want to send the announcement.
Please note, the maximum amount of characters that can be sent in a single message is 4096 (which includes the date and subject).
You are now ready to upload an Excel sheet of all the employees that you want to send the announcement.
Bulk Upload
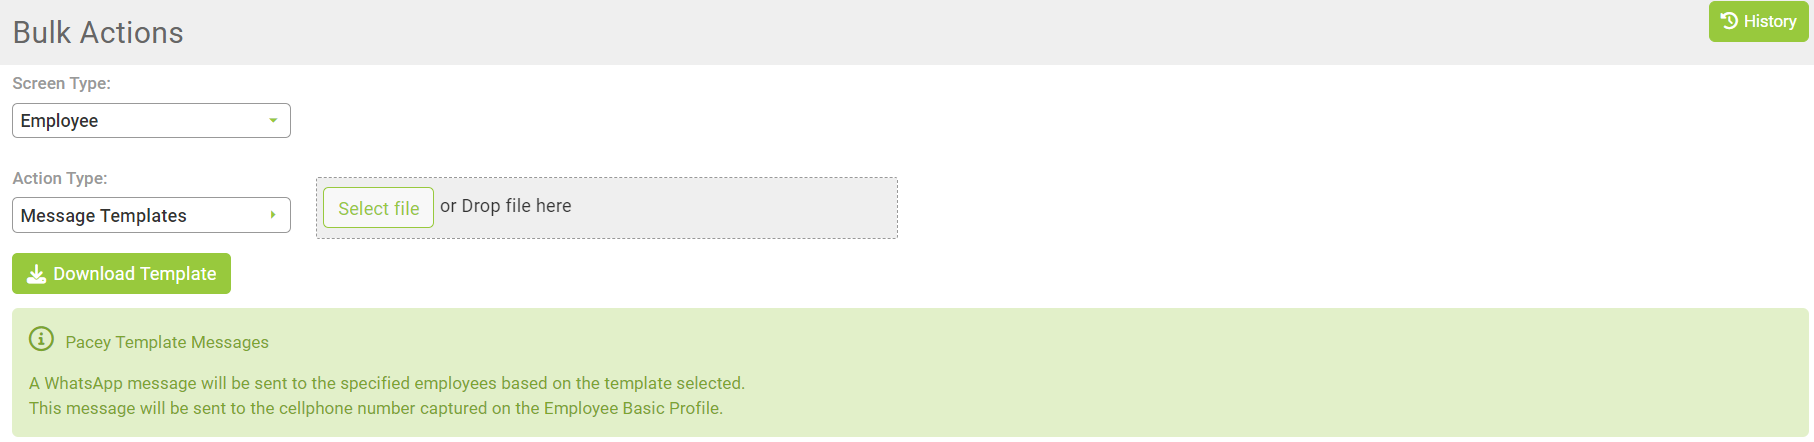
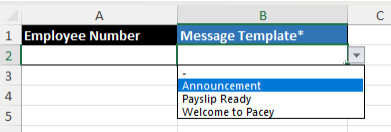
Navigate to the “Bulk Actions” menu item, select the “Message Templates” option under the “Pacey” heading in the “Action Type” drop down list. Download the empty excel bulk upload template and select the “Announcement” option as per the below screenshot.
Testing
We suggest that you send the announcement to yourself first to review that the message is received as expected and then upload it for the relevant employees.
Related Articles
Why am I unable to upload a Pacey announcement via the Bulk Actions screen?
An announcement will not be sent if the "show on grid" checkbox has not been selected on the Company Custom Form Configuration screen. Ensure that the "show on grid" checkbox for Message and for Subject is selected for both Custom Fields. Navigate > ...How do I configure Pacey Message Templates to send to employees via Bulk Actions?
To ensure that businesses do not use WhatsApp for randomly spamming its users, WhatsApp does not allow businesses to send out just any arbitrary message to its users. They only allow a “Business Template Message” that they have approved, to be sent. ...Can custom forms be created via the Bulk Actions screen?
Yes. Custom Forms can be created via the Bulk Actions screen. Navigate > Bulk ActionsCan custom forms be linked to an employee record via the Bulk Actions screen?
Yes. Custom forms can be added to employee records provided that they have been configured on company level first. Navigate > Bulk ActionsCan a custom form be added to other screens beside the Custom Forms screen?
Yes. Instead of saving all custom forms to the Custom Forms screen under the Basic Information section on the employee's profile, custom forms can now be appended to an existing employee screen. This can be done on the Custom Form Configuration ...